Developers · Tutorial
Connect Salesforce to Salesforce using JWT
A working Salesforce-to-Salesforce JWT bearer flow using an External Client App, a certificate, custom metadata and Apex you can paste into a real org.
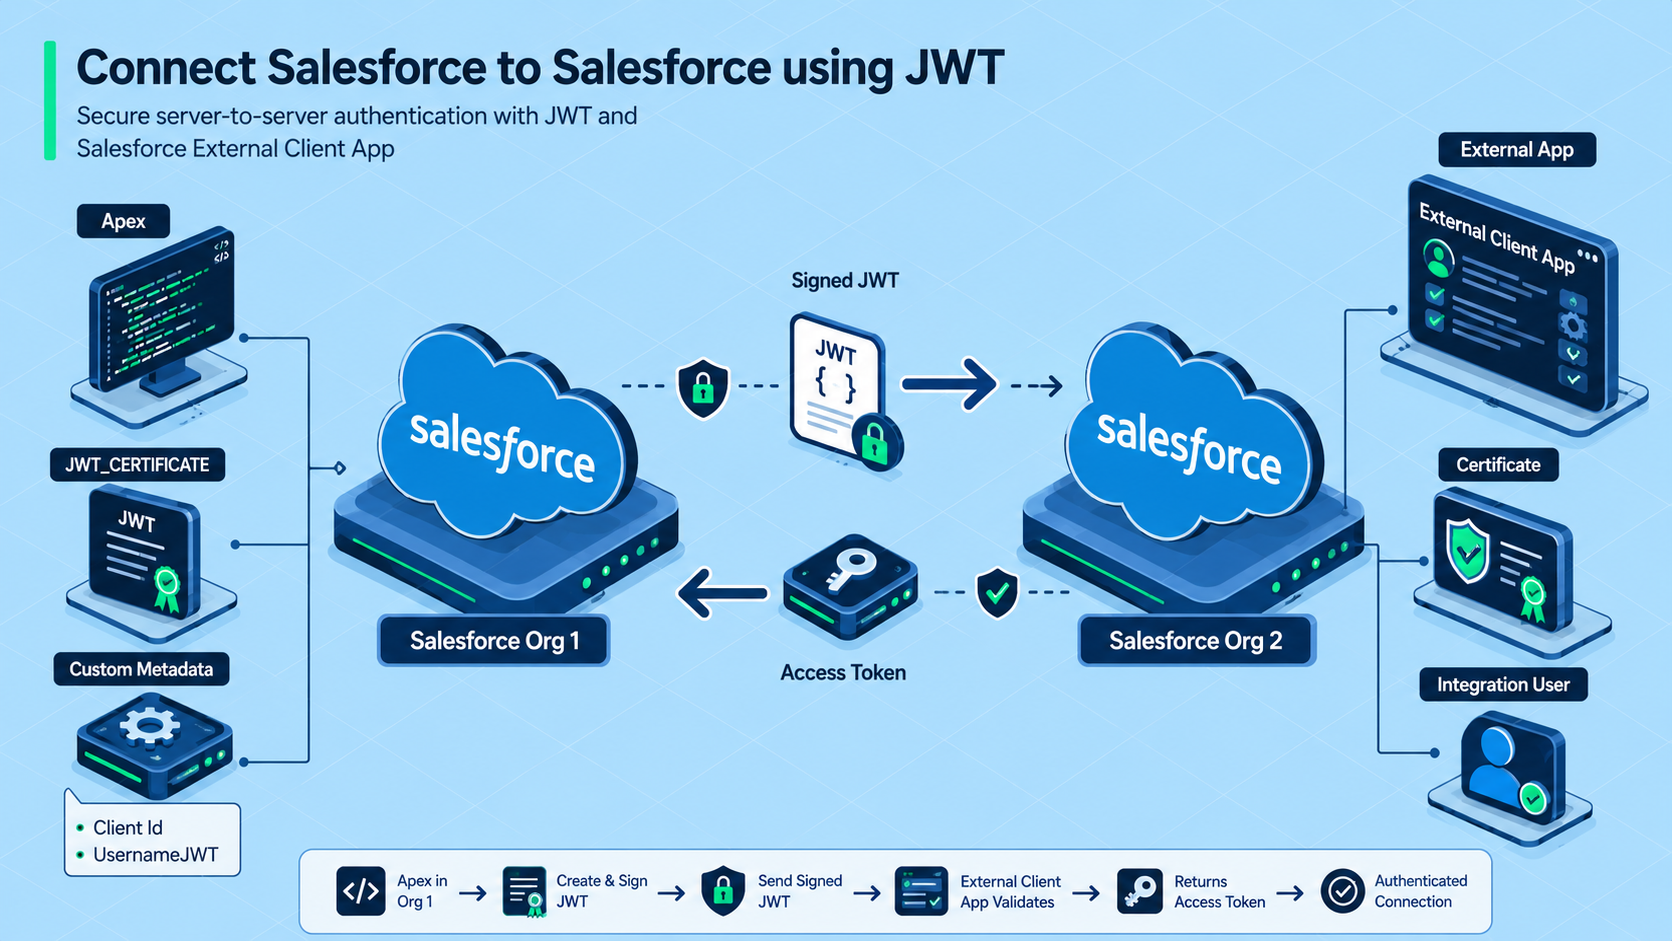
This tutorial documents a working org-to-org JWT bearer flow between two Salesforce environments. One org signs the JWT with a certificate. The second org validates that signature through an External Client App and returns an access token that Apex can use for callouts.
1. Prepare the target org user
The target org needs a real user that the JWT will impersonate. In the demo that user was a System Administrator inside Salesforce 2. In a production org I would prefer a dedicated integration user or at least a reduced profile plus permission sets.
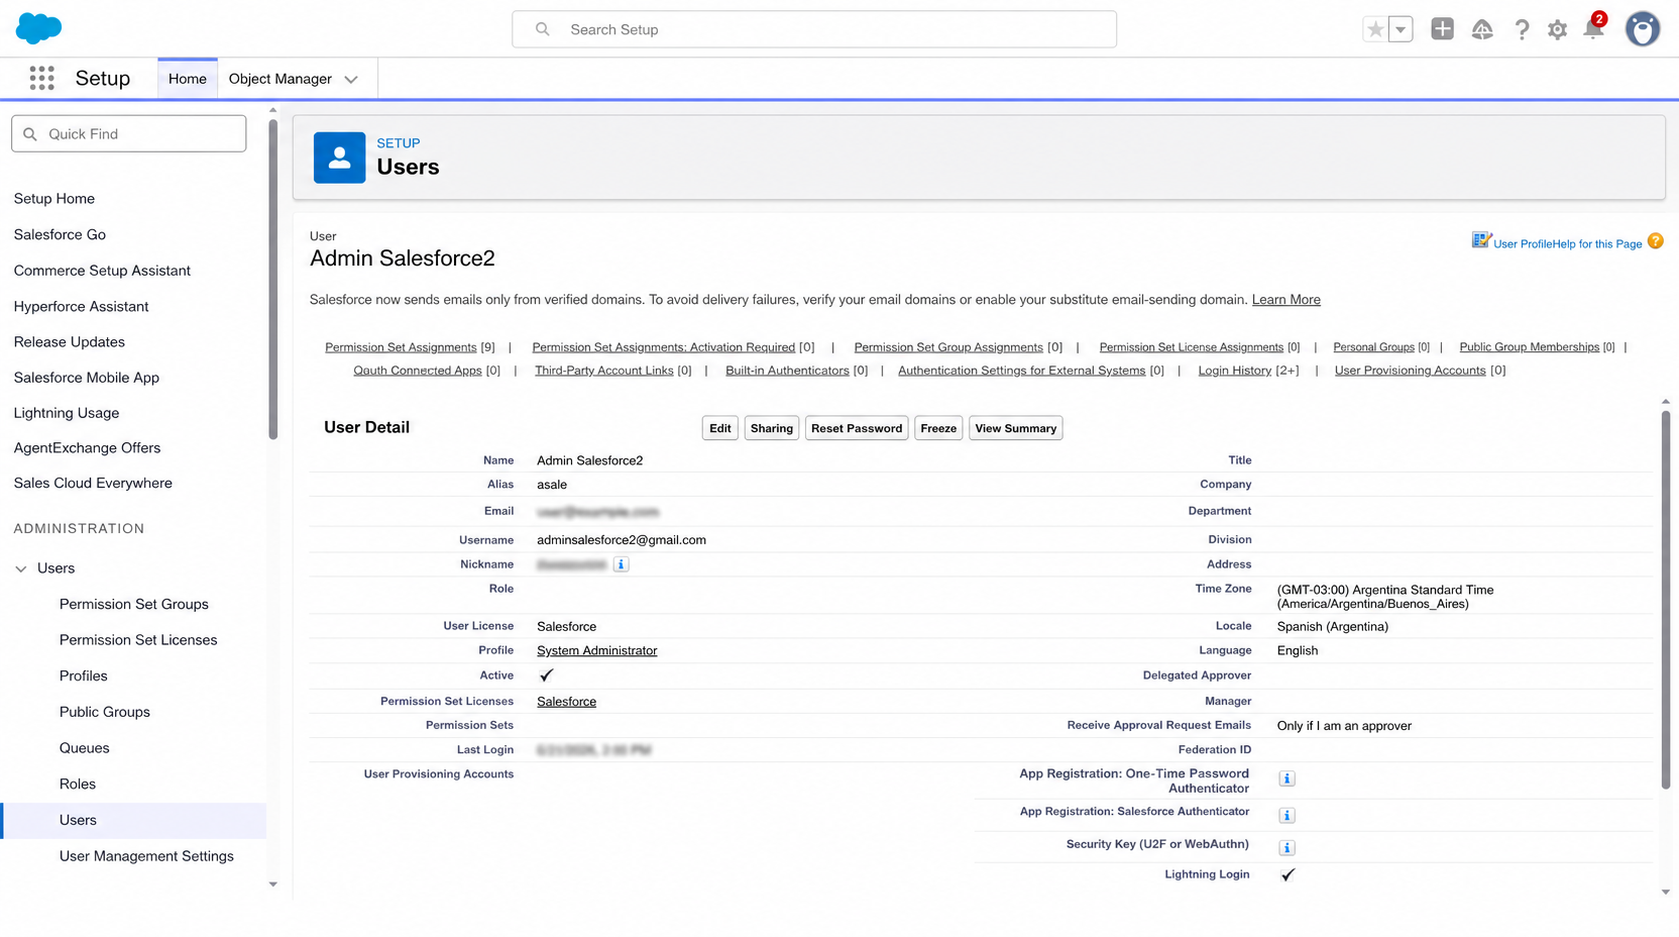
- The username is the value you later send in
jwt.setSub(...). - The profile or permission set must be allowed by the External Client App policy.
- If you change the username later, the JWT flow stops working until you update the metadata in the source org.
2. Create the External Client App in Salesforce 2
The most important part of the target org configuration is the External Client App. This is where Salesforce decides who can use the app, which flows are enabled and which certificate is trusted.
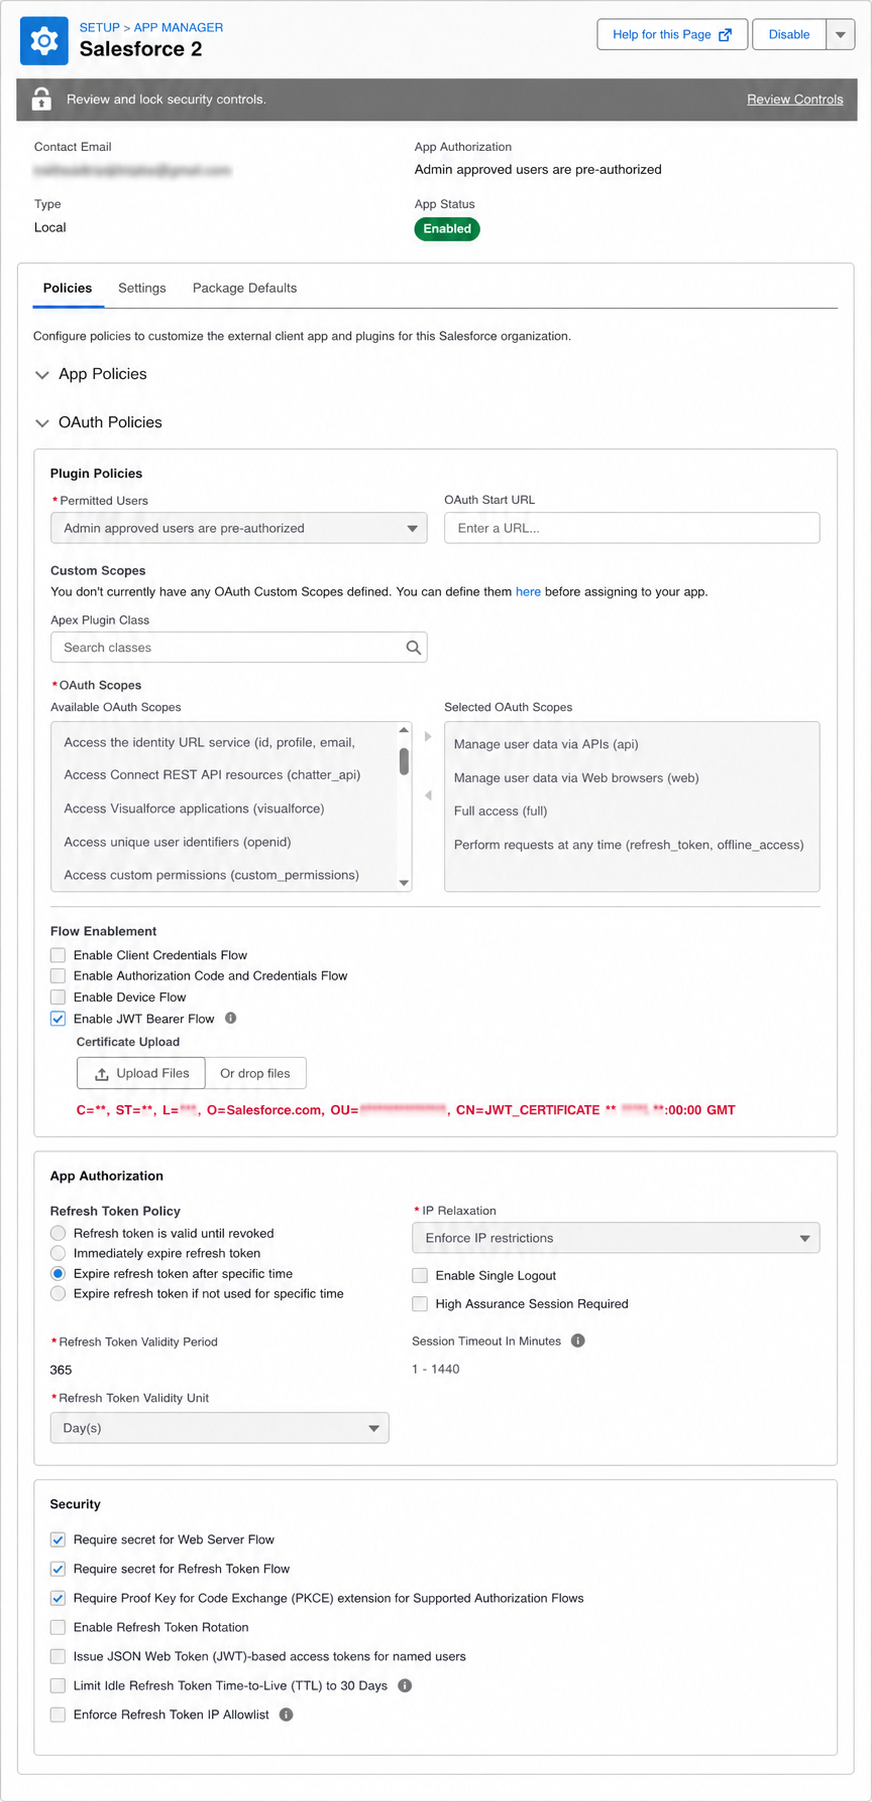
| Setting | Value used in the demo | Why it matters |
|---|---|---|
| Permitted Users | Admin approved users are pre-authorized |
Keeps the app locked down to explicitly authorized users, profiles or permission sets. |
| Selected Profiles | System Administrator |
The JWT subject must belong to a profile or permission set allowed here. |
| Callback URL | http://localhost:1717/OauthRedirect |
JWT does not use an interactive redirect, but Salesforce still expects a valid callback URL in the app settings UI. |
| OAuth Scopes | api, web, full, refresh_token |
These were enough for the demo. Keep only the scopes your integration genuinely needs. |
| Flow Enablement | Enable JWT Bearer Flow |
This is the switch that makes the certificate-based token exchange possible. |
| Certificate Upload | Public certificate from Salesforce 1 | The target org validates the signature against this certificate. |
| Refresh Token Policy | Expire refresh token after specific time / 365 Day(s) |
This is how the demo org was configured. JWT flows can often stay simpler because they mint tokens on demand. |
| IP Relaxation | Enforce IP restrictions |
Use the level of network control your environment requires. |
After you save the app, open the consumer key screen and copy the Consumer Key. That is the value stored later as Client_Id__c in custom metadata.
3. Create the certificate in Salesforce 1
In the source org, go to Certificate and Key Management and create a self-signed certificate. The demo used JWT_CERTIFICATE. The name matters because Apex references it directly when building the signed JWS.
- Create the certificate in the org that will execute the Apex callout.
- Upload that public certificate into the JWT bearer flow configuration of the target org app.
- If you rotate the certificate later, update both sides: the source org certificate reference and the target org trusted certificate.
4. Store the consumer key and JWT username in custom metadata
I kept the runtime values outside the class in a custom metadata record so the code stays deployable and the configuration stays editable. In the demo the type was JWT_Setting__mdt and the record label was ConfigJWT.
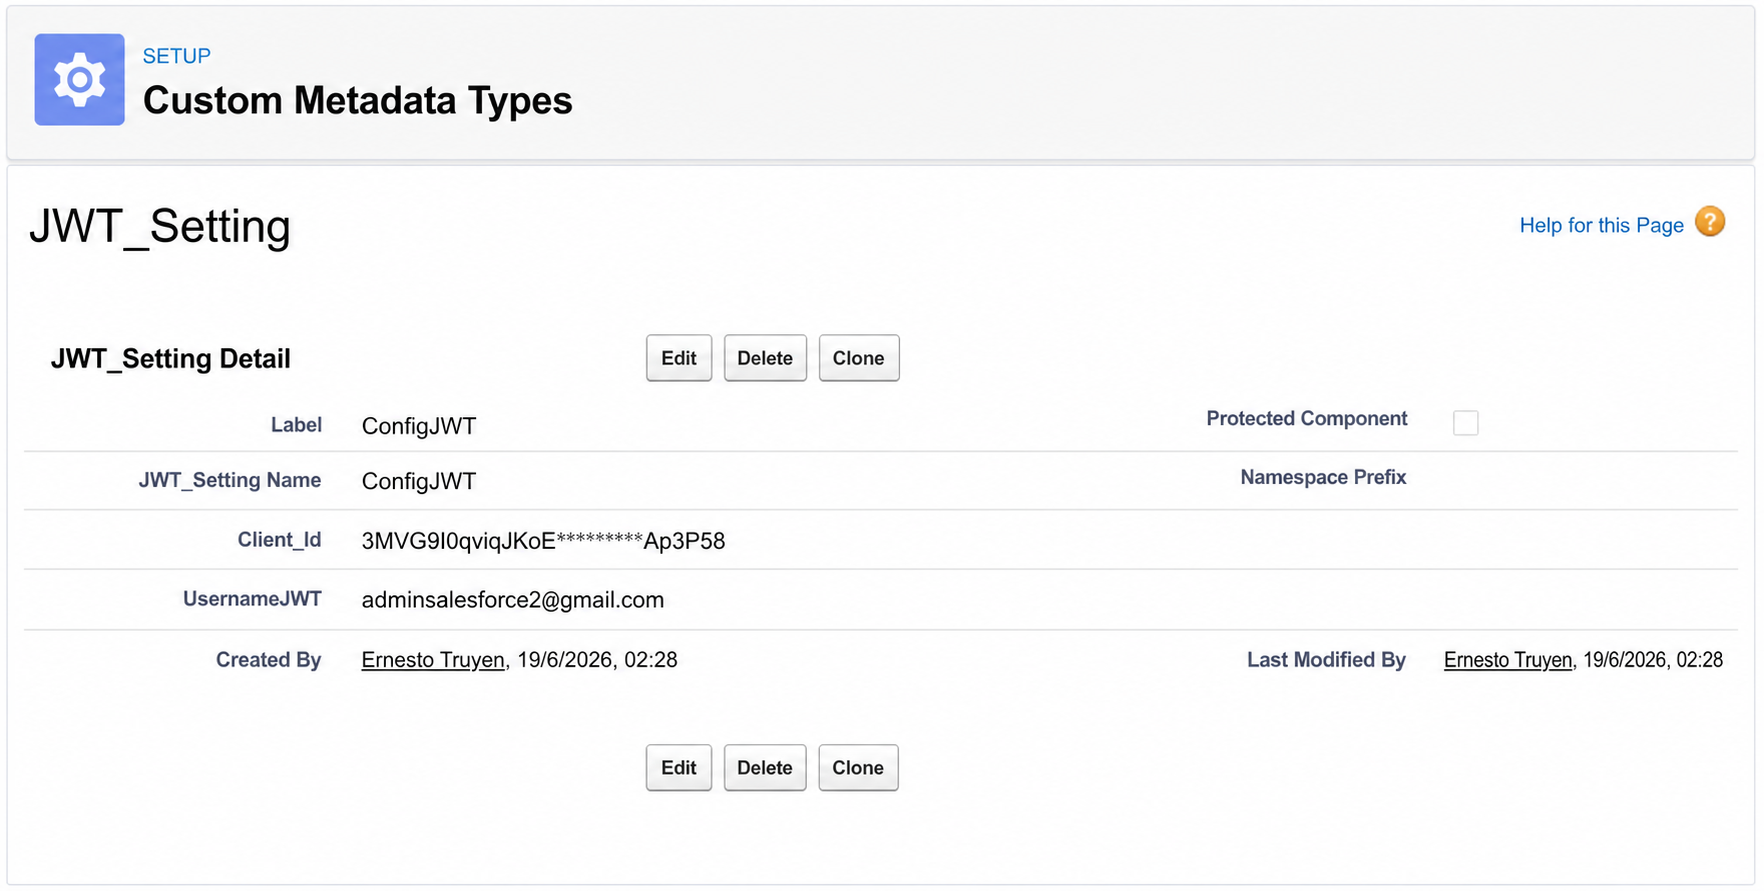
Client_Id__c: the External Client App consumer key from Salesforce 2.UsernameJWT__c: the integration username from Salesforce 2.ConfigJWT: a readable label so the Apex query can load one known configuration record.
5. Validate the flow from Salesforce 1
Once the metadata record, certificate and External Client App are in place, the last visual checkpoint is the execution result in Salesforce 1. The important thing here is not the editor tab itself, but the log entry proving the token exchange succeeded.
System.debug(
    'Access Token: ' + GetAccessTokenSalesforce2.getAccessToken()
);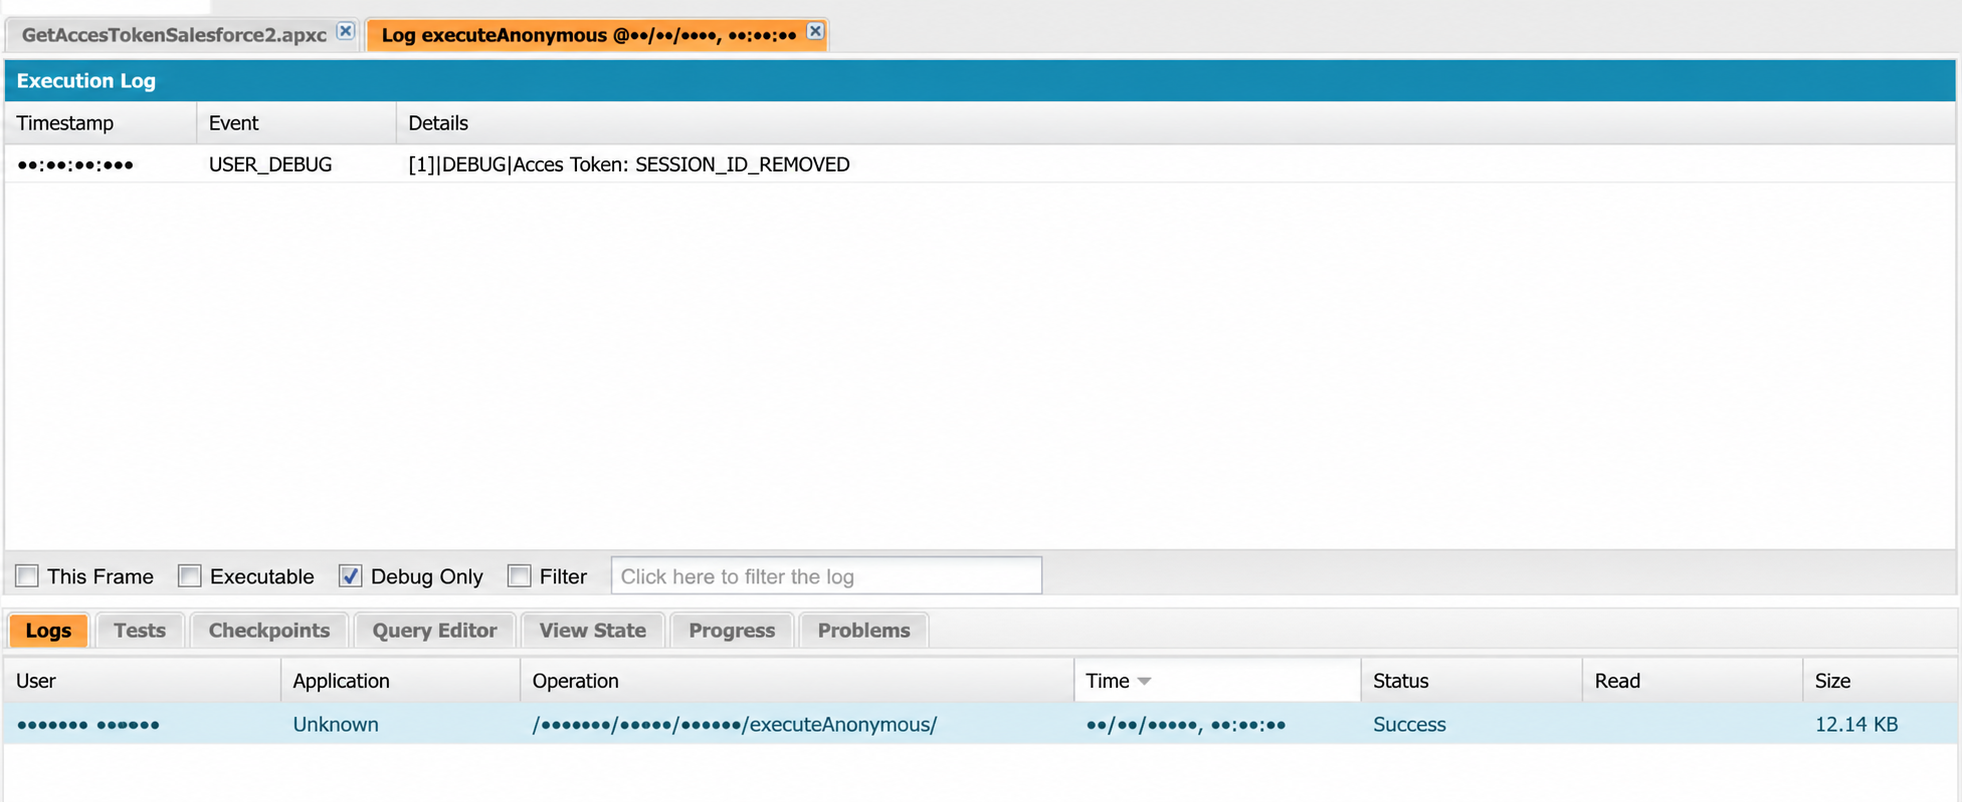
SESSION_ID_REMOVED.If the debug log shows SESSION_ID_REMOVED, that is usually a good sign. Salesforce returned the token, but the platform redacted it in the log output for security reasons.
6. Reusable Apex snippets
The screenshots above document the setup. The code below is the copy-paste appendix I would keep for the next project.
JWTServiceWrapper.cls
This wrapper creates the JWT, derives the correct audience from the target token URL and exchanges it for an access token. I kept the test injection points because they make the class easy to fake in unit tests.
public virtual class JWTServiceWrapper {
    private static final String SANDBOX_AUDIENCE = 'https://test.salesforce.com';
    private static final String PRODUCTION_AUDIENCE = 'https://login.salesforce.com';

    @TestVisible
    private String testClientId;
    @TestVisible
    private String testUsernameJWT;

    public void setTestValues(String clientId, String username) {
        testClientId = clientId;
        testUsernameJWT = username;
    }

    public virtual String getTestClientId() {
        return testClientId;
    }

    public virtual String getTestUsernameJWT() {
        return testUsernameJWT;
    }

    public virtual String generateAccessToken(
        String clientId,
        String username,
        String tokenUrl,
        String certificateName
    ) {
        Auth.JWT jwt = new Auth.JWT();
        jwt.setSub(username);
        jwt.setIss(clientId);
        jwt.setAud(getAudienceUrl(tokenUrl));

        Auth.JWS jws = new Auth.JWS(jwt, certificateName);
        Auth.JWTBearerTokenExchange bearer = new Auth.JWTBearerTokenExchange(tokenUrl, jws);
        return bearer.getAccessToken();
    }

    @TestVisible
    private String getAudienceUrl(String tokenUrl) {
        String normalizedUrl = tokenUrl.toLowerCase();
        if (
            normalizedUrl.contains('test.salesforce.com') ||
            normalizedUrl.contains('.sandbox.my.salesforce.com')
        ) {
            return SANDBOX_AUDIENCE;
        }

        return PRODUCTION_AUDIENCE;
    }
}GetAccessTokenSalesforce2.cls
This class is the public entry point. Replace the token URL with the target org domain and keep the certificate name in sync with the one created in Salesforce 1.
public with sharing class GetAccessTokenSalesforce2 {
    private static final String TOKEN_URL =
        'https://your-target-org.my.salesforce.com/services/oauth2/token';
    private static final String CERTIFICATE_NAME = 'JWT_CERTIFICATE';

    @TestVisible
    private static JWTServiceWrapper jwtService = new JWTServiceWrapper();

    public static void setJWTService(JWTServiceWrapper mock) {
        jwtService = mock;
    }

    public static String getAccessToken() {
        String clientId;
        String usernameJWT;

        if (Test.isRunningTest()) {
            clientId = jwtService.getTestClientId();
            usernameJWT = jwtService.getTestUsernameJWT();
        } else {
            JWT_Setting__mdt settings = [
                SELECT Client_Id__c, UsernameJWT__c
                FROM JWT_Setting__mdt
                WHERE MasterLabel = 'ConfigJWT'
                LIMIT 1
            ];

            clientId = settings.Client_Id__c;
            usernameJWT = settings.UsernameJWT__c;
        }

        return jwtService.generateAccessToken(
            clientId,
            usernameJWT,
            TOKEN_URL,
            CERTIFICATE_NAME
        );
    }
}
Execute Anonymous
This is enough to test the integration after the two classes and the metadata record are in place:
System.debug(
    'Access Token: ' + GetAccessTokenSalesforce2.getAccessToken()
);
Common mistakes
- Using the wrong
subusername. It must exist in the target org and be authorized for the app. - Uploading the wrong certificate or forgetting to enable
JWT Bearer Flowin the External Client App. - Hardcoding the consumer key in Apex instead of storing it in deployable configuration.
- Pointing
TOKEN_URLto the wrong org domain. - Choosing the wrong audience. Sandboxes authenticate against
https://test.salesforce.com; production and Developer Edition usehttps://login.salesforce.com. - Assuming the debug log will print the raw token. Salesforce deliberately redacts it.
Minimal checklist I would copy into a new project
- Create an integration user in the target org.
- Create an External Client App and pre-authorize that user or profile.
- Enable
JWT Bearer Flowand upload the source org certificate. - Create
JWT_CERTIFICATEin the source org. - Create
JWT_Setting__mdtwithClient_Id__candUsernameJWT__c. - Paste the snippets from the appendix, update
TOKEN_URL, then run Execute Anonymous.